Add Menus, Menu items and Keyboard Shortcuts
This document outlines the basic features of working with Menus, including:
- How to add a Menu
- How to add a SubMenu
- How to add a Menu item
- How to position a Menu item
- How to add a keyboard shortcut to a Menu item
Adding a Menu
To add a custom menu, follow these steps :-
-
Import the
Menusmodule. To use the menu functionality, import theMenusmodule:const Menus = brackets.getModule("command/Menus"); -
Create the menu.
Use
Menus.addMenu()to add a menu to the menu bar. Provide the display name and the identifier. The identifier must be written insnake_case.
Providing the identifier is necessary to display the menu on the menu bar. This identifier may later be used to add menu items inside it or even remove the menu if needed.
// Add a menu to the menu bar
const menu = Menus.addMenu('Test', 'Test_Extension_Docs');
For a detailed description, refer to this link.
Full Code Example :-
define(function (require, exports, module) {
    "use strict";

    // Brackets modules
    const AppInit = brackets.getModule("utils/AppInit"),
        Menus = brackets.getModule("command/Menus");

    // Add a menu to the menu bar
    const menu = Menus.addMenu('Test', 'Test_Extension_Docs');

    // Initialize extension once shell is finished initializing.
    AppInit.appReady(function () {
        console.log("hello world");
    });
});
Expected Output :-
Adding a Menu Item
To add a menu item, follow these steps :-
-
Import the
MenusandCommandManagermodule.These modules allow you to register commands and add items to menus:
const CommandManager = brackets.getModule("command/CommandManager");
const Menus = brackets.getModule("command/Menus"); -
Register the Command
Use CommandManager.register() to associate an ID with a function:
function handleTestExtension() {
    alert("Test menu item");
}

// The `CommandID` must be written in snake_case
const MY_COMMAND_ID = "test_menuitem";
CommandManager.register("Test", MY_COMMAND_ID, handleTestExtension);
- The first argument is the label for the menu item.
- The second argument is a unique command ID.
- The third argument is the handler function to execute when the item is clicked.
-
Add the Menu Item To add the menu item, use
menu.addMenuItem(). For instance, if you wish to add an item to the File menu, you can write:const menu = Menus.getMenu(Menus.AppMenuBar.FILE_MENU);
menu.addMenuItem(MY_COMMAND_ID);
These are some of the menus available by default :-
- FILE_MENU : ‘file-menu’
- EDIT_MENU : ‘edit-menu’
- FIND_MENU : ‘find-menu’
- VIEW_MENU : ‘view-menu’
- NAVIGATE_MENU : ‘navigate-menu’
You can also add menu items to any custom menus you create.
For a detailed description, refer to this link.
Full Code Example :-
define(function (require, exports, module) {
"use strict";
// Brackets modules
const AppInit = brackets.getModule("utils/AppInit"),
CommandManager = brackets.getModule("command/CommandManager"),
Menus = brackets.getModule("command/Menus");
// Function to run when the menu item is clicked
function handleTestExtension() {
alert("Test menu item");
}
// The `CommandID` must be written in snake_case
const MY_COMMAND_ID = "test_menuitem";
CommandManager.register("Test", MY_COMMAND_ID, handleTestExtension);
// Add Menu item
const menu = Menus.getMenu(Menus.AppMenuBar.FILE_MENU);
menu.addMenuItem(MY_COMMAND_ID);
// Initialize extension once shell is finished initializing.
AppInit.appReady(function () {
console.log("hello world");
});
});
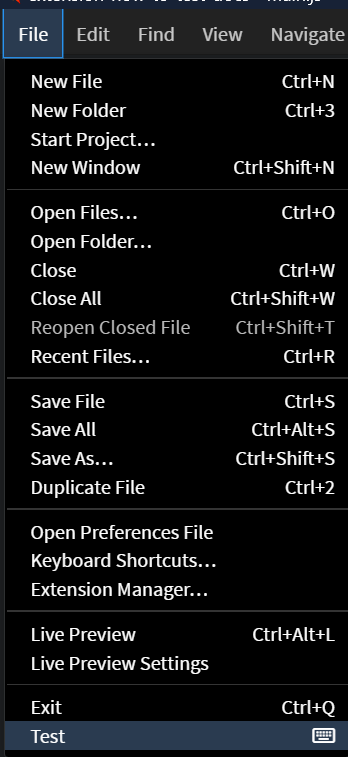
Expected Output :-

The alert box that appears when the Test menu item is clicked!
Position the Menu Item
You can position the menu item to make it appear at the first, last or before/after a given item.
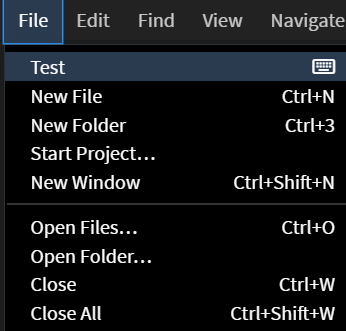
To position the menu item at the top, use
// second parameter is for keyboard shortcut. Empty string means no shortcut.
menu.addMenuItem(MY_COMMAND_ID, "", Menus.FIRST);

Menus.FIRST is used to position it before every other item. Note: It is recommended to avoid using this and prefer relative menu IDs for better positioning.*
Menus.LAST is used to position it at the end. It is the Default value.
To position the menu item before or after any item, use
// second parameter is for keyboard shortcut. Empty string means no shortcut.
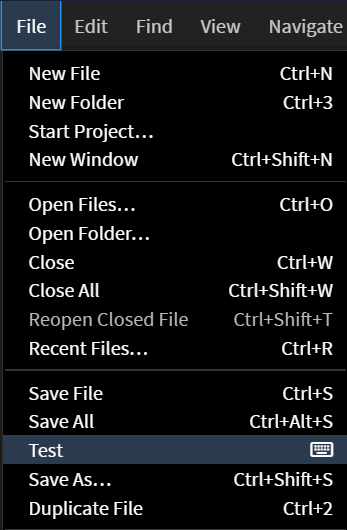
menu.addMenuItem(MY_COMMAND_ID, "",  Menus.BEFORE, Commands.FILE_SAVE_AS);
- Third parameter must specify
BEFOREorAFTERthe item should be set. - Fourth parameter must specify the “relativeID” of the menu item to set the position.

Here, the menu item is set before the Save As... option.
To get the list of all the RelativeIDs available by default, refer to this link.
Attach a keyboard shortcut to a Menu Item
You can assign a keyboard shortcut to your menu item.
Note: Only add shortcuts if they're essential and frequently used, ensuring compatibility across platforms. Users can set custom shortcuts, so default shortcuts should be reserved only for high-use actions.
To add the keyboard shortcut, use :-
-
Import the
KeyBindingManagermodule.const KeyBindingManager = brackets.getModule("command/KeyBindingManager"); -
Add the keyboard shortcut to
addMenuItem. The keyboard shortcut will be displayed next to the menu item in the UI.Ensure that the keyboard shortcut you choose doesn't conflict with any existing shortcuts already in use.
menu.addMenuItem(MY_COMMAND_ID, "Ctrl-Alt-T", Menus.FIRST); -
Register the keyboard shortcut. To register use
addBinding(). The first parameter will be theCommandIDof the menu item and the second parameter will be the keyboard shortcut.KeyBindingManager.addBinding(MY_COMMAND_ID, "Ctrl-Alt-T");
That's it! Now, pressing the assigned keyboard shortcut will trigger the corresponding menu item.
For a detailed description, refer to this link.
Full Code Example :-
define(function (require, exports, module) {
    "use strict";

    // Brackets modules
    const AppInit = brackets.getModule("utils/AppInit"),
        CommandManager = brackets.getModule("command/CommandManager"),
        Menus = brackets.getModule("command/Menus"),
        KeyBindingManager = brackets.getModule("command/KeyBindingManager");

    // Function to run when the menu item is clicked
    function handleTestExtension() {
        alert("Test menu item");
    }

	  const MY_COMMAND_ID = "test_menuitem";
	  CommandManager.register("Test", MY_COMMAND_ID, handleTestExtension);

    // Add Menu item
    const menu = Menus.getMenu(Menus.AppMenuBar.FILE_MENU);

    menu.addMenuItem(MY_COMMAND_ID, "Ctrl-Alt-T", Menus.FIRST);

    // Register the keyboard shortcut
    KeyBindingManager.addBinding(MY_COMMAND_ID, "Ctrl-Alt-T");

    // Initialize extension once shell is finished initializing.
    AppInit.appReady(function () {
        console.log("hello world");
    });
});
Adding a Sub Menu
To add a submenu to an existing menu item, follow these steps:
- Import the
MenusandCommandManagermodules
const CommandManager = brackets.getModule("command/CommandManager");
const Menus = brackets.getModule("command/Menus");
- Create and register the main command First, create a command that will serve as the parent menu item:
function handleTestExtension() {
    alert("Test menu item");
}

const MY_COMMAND_ID = "Test";
CommandManager.register("Test", MY_COMMAND_ID, handleTestExtension);
- Get the parent menu and create the submenu
Use
menu.addSubMenu()to create a submenu under an existing menu:
const menu = Menus.getMenu(Menus.AppMenuBar.FILE_MENU);
const subMenu = menu.addSubMenu(MY_COMMAND_ID, "Test_Sub_Menu");
- First parameter is the command ID of the parent menu item
- Second parameter is the identifier for the submenu (must be in
snake_case)
- Create and register submenu commands Register commands for each submenu item:
const SUB_COMMAND_1 = "Test_SubCommand1";
const SUB_COMMAND_2 = "Test_SubCommand2";

CommandManager.register("Sub Item 1", SUB_COMMAND_1, function() {
    alert("Sub Item 1 clicked");
});
CommandManager.register("Sub Item 2", SUB_COMMAND_2, function() {
    alert("Sub Item 2 clicked");
});
- Add items to the submenu
Use
addMenuItem()to add the registered commands to your submenu:
subMenu.addMenuItem(SUB_COMMAND_1);
subMenu.addMenuDivider();  // Add a separator line
subMenu.addMenuItem(SUB_COMMAND_2);
For visual separation between menu items, you can add a divider using
addMenuDivider().
→ For a detailed description, refer to this link.
Full Code Example:
define(function (require, exports, module) {
    "use strict";

    // Brackets modules
    const AppInit = brackets.getModule("utils/AppInit"),
        CommandManager = brackets.getModule("command/CommandManager"),
        Menus = brackets.getModule("command/Menus");

    // Function to run when the menu item is clicked
    function handleTestExtension() {
        alert("Test menu item");
    }

    // Main command
    const MY_COMMAND_ID = "Test";
    CommandManager.register("Test", MY_COMMAND_ID, handleTestExtension);

    // Add menu item
    const menu = Menus.getMenu(Menus.AppMenuBar.FILE_MENU);

    // Add sub menu
    const subMenu = menu.addSubMenu(MY_COMMAND_ID, "Test_Sub_Menu");

    // Additional submenu commands
    const SUB_COMMAND_1 = "Test_SubCommand1";
    const SUB_COMMAND_2 = "Test_SubCommand2";

    // Register new commands
    CommandManager.register("Sub Item 1", SUB_COMMAND_1, function() {
        alert("Sub Item 1 clicked");
    });
    CommandManager.register("Sub Item 2", SUB_COMMAND_2, function() {
        alert("Sub Item 2 clicked");
    });

    // Add items inside sub menu
    subMenu.addMenuItem(SUB_COMMAND_1);
    subMenu.addMenuDivider();  // Add separator
    subMenu.addMenuItem(SUB_COMMAND_2);

    // Initialize extension once shell is finished initializing.
    AppInit.appReady(function () {
        console.log("hello world");
    });
});
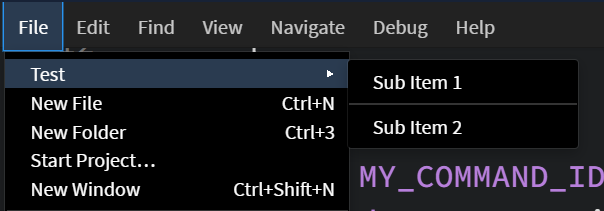
Expected Output:

When a submenu item is clicked, it will show an alert box with the corresponding message.
Note: Make sure all command IDs are unique throughout your extension to avoid conflicts.
You can add as many submenu items as needed by repeating steps 4 and 5 for each new item. You can even create nested submenu items.
Submenu items can have their own keyboard shortcuts using the same method described in the "Attach a keyboard shortcut to a menu item" section.