Replace text across files
Use Find → Replace in Files to change the same text on several pages, such as your website's name. Review the matching lines before applying your changes.
You'll open the project, enter the old and new text, choose the changes to apply, and save. These steps work in Community (free) and Phoenix Pro.
1. Open your project
A project is the folder containing the files you are working on. If the correct project is already open, keep using it.
If Live Preview fills the app, click its restore icon to show the editor and sidebar, the file list on the left.
Need a sample project? Download the optional practice website and extract the ZIP. Use its first-website folder in the steps below.
To open a project:
- Click the folder with a plus sign in the top-left corner of Phoenix Code. The Start Project window opens.
- Click Open Folder, select the folder containing your files, and confirm.
- Check the project name and file list in the sidebar. These are the files you are about to search.
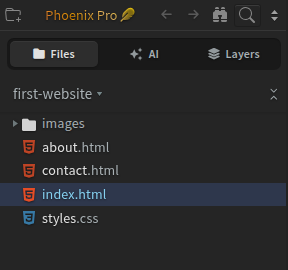
The example uses a project named first-website. Your project can have a different name.
Watch the walkthrough
The video starts with the project already open.
2. Enter the old and new text
- Click the magnifying glass above the file list to open Find in Files.
- In Find…, enter the text you want to change. Matching lines appear in Search Results below the editor.
- Open the Find menu at the top of the code editor and click Replace in Files. Your search text stays in Find…, and a Replace with… box appears.
- In Replace with…, enter the new text.
- Leave Regular Expression (
.*) off for an ordinary text search. - Check the file filter in the search bar. Leave it on No Files Excluded to search across the project.
- Click Replace… to open the review list.
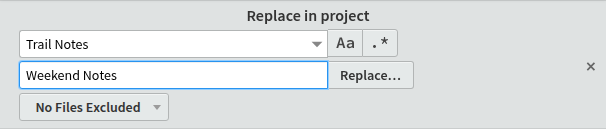
This example changes Trail Notes to Weekend Notes. Use text from your own project when following the steps.
Your files haven't changed yet. A match is one place where the old text appears. The matches are grouped by filename in Search Results at the bottom of the editor. Drag the panel's top edge upward if you need more room.
3. Choose which matches to replace
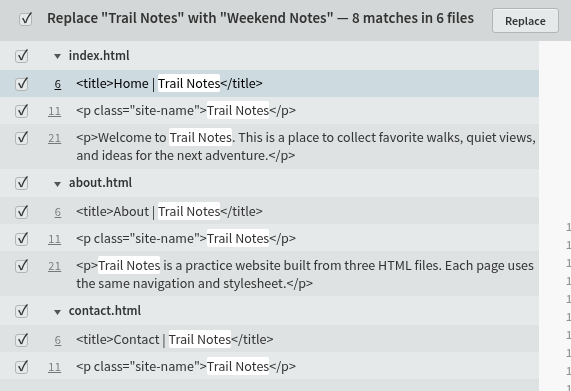
Your review will show the words and files you chose. Click either wide screenshot to view it full size.
- Check the old and new text in the review heading.
- Read the matching lines. Click the small ▸ triangle beside a filename if its matches are hidden.
- Keep only the changes you want checked. Clear a match's checkbox to skip it, or clear the checkbox beside a filename to skip the whole file.
- Click Replace in the results toolbar to apply the checked changes.
Replace… opens the review; Replace in that review applies your selection.
4. Save and check
- Choose File → Save All to save every changed file.
- Double-click a changed file in the sidebar and check that the new text appears where you expected.
- Click the magnifying glass above the file list again to open Find in Files.
- Search for the original text again, keeping the same project and file filters.
If you replaced every match in that search, you should get No results. If you skipped some matches, check that the remaining results are the ones you meant to keep.
For the practice website, replacing all eight matches updates index.html, about.html, and contact.html. A search for Trail Notes should then return No results.
Shortcut: open Replace in Files with Ctrl+Shift+H on Windows/Linux or Cmd+Option+Shift+F on macOS. Use the Find menu if your browser or operating system handles the shortcut instead.
Need help?
Can I limit the replacement to a folder or file type?
Right-click a folder in the file list and choose Replace in… to work within that folder. To search only HTML files, choose Search in files in the filter dropdown and enter *.html.
See Find in Files filtering for more examples.
Why is the file count different from the files listed?
The review header can overcount files in the current web app. Check the filename groups and their matching lines. In the sample screenshot, the eight matches belong to three files, even though the header says six.
Can I undo the replacements?
Open each changed file and choose Edit → Undo there, then choose File → Save All. One Undo does not revert every file in the project.
On larger projects, Phoenix Code may show Replace Without Undo. That option can change unopened files on disk without an undo history. Cancel and make a backup of your project before continuing.
For a change in just one file, follow Replace text in one file. For search instructions, see Find in Files.