Dialogs and Buttons
Adding a Dialog Box and Buttons
To add a dialog box, follow these steps:
- Import the required modules.
Import the
DialogsandDefaultDialogsmodules along with other necessary modules:
const DefaultDialogs = brackets.getModule("widgets/DefaultDialogs"),
      Dialogs = brackets.getModule("widgets/Dialogs");

 // other modules you may require
const AppInit = brackets.getModule("utils/AppInit"),
      CommandManager = brackets.getModule("command/CommandManager"),
      Menus = brackets.getModule("command/Menus");
-
Create a function to show the dialog
To create a dialog you can use the specialized dialog APIs such as
Dialogs.showConfirmDialog,Dialogs.showInfoDialogandDialogs.showErrorDialogprovided by theDialogsmodule:
function handleHelloWorld() {
    Dialogs.showInfoDialog(
        "hello",   // Title
        "world"    // Message
    );
}
The Dialogs.showInfoDialog() method is the preferred way to display information messages.
Similarly, you can use Dialogs.showErrorDialog() for error messages:
function handleError() {
  Dialogs.showErrorDialog(
				"Error",
				"Something went wrong!"
	);
}
You can also close the dialog programmatically using the Dialog.close() method.
function handleHelloWorld() {
    const dialog = Dialogs.showInfoDialog(
        "hello",
        "world"
    );

    // Close the dialog after 2 seconds
    setTimeout(() => {
        dialog.close();
    }, 2000);
}
This will automatically close the dialog after 2 seconds.
These specialized dialog methods handle the common use cases.
Click on the functions to read more about them : showConfirmDialog(), showInfoDialog, showErrorDialog.
If you require custom buttons or advanced functionality, you can use the generic showModalDialog() method.
Click here to read more about creating custom dialog boxes.
- Register the command Register a command that will trigger the dialog:
const MY_COMMAND_ID = "helloworld_sayhello";
CommandManager.register("Hello World", MY_COMMAND_ID, handleHelloWorld);
- Add the menu item Add a menu item that will execute the command:
const menu = Menus.getMenu(Menus.AppMenuBar.FILE_MENU);
menu.addMenuItem(MY_COMMAND_ID);
Full Code Example:
define(function (require, exports, module) {
    "use strict";

    // Brackets modules
    const AppInit = brackets.getModule("utils/AppInit"),
        DefaultDialogs = brackets.getModule("widgets/DefaultDialogs"),
        Dialogs = brackets.getModule("widgets/Dialogs"),
        CommandManager = brackets.getModule("command/CommandManager"),
        Menus = brackets.getModule("command/Menus");

    // Function to run when the menu item is clicked
    function handleHelloWorld() {
        Dialogs.showInfoDialog(
            "hello",
            "world"
        );
    }

    // Register command
    const MY_COMMAND_ID = "helloworld_sayhello";
    CommandManager.register("Hello World", MY_COMMAND_ID, handleHelloWorld);

    // Add menu item
    const menu = Menus.getMenu(Menus.AppMenuBar.FILE_MENU);
    menu.addMenuItem(MY_COMMAND_ID);

    // Initialize extension
    AppInit.appReady(function () {
        console.log("hello world");
    });
});
Expected Output:
When the menu item is clicked, a dialog box appears:
Creating Custom Dialog Boxes
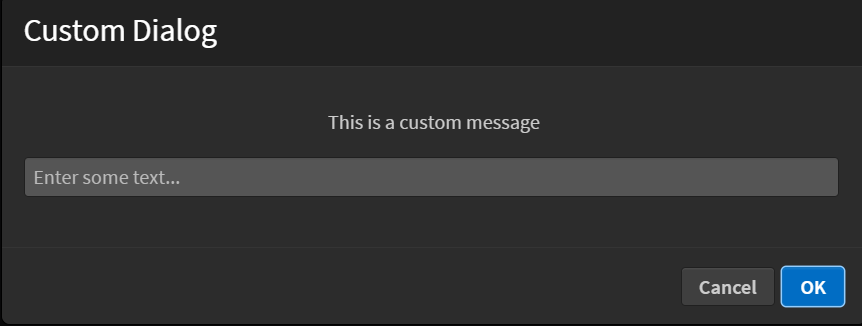
While the specialized dialog methods like showInfoDialog(), showConfirmDialog() and showErrorDialog() cover the common use cases, you can also create more complex custom dialog boxes using showModalDialog(). Here's how:
const dialog = Dialogs.showModalDialog(
  DefaultDialogs.DIALOG_ID_INFO,
  "Custom Dialog",
  // Custom HTML content with CSS styling
  '<div class="custom-dialog">' +
    '<p style="text-align: center">This is a custom message</p>' +
    '<input style="width: 97%" type="text" id="custom-input" placeholder="Enter some text...">' +
    "</div>",
  [
    // For buttons
    {
      className: Dialogs.DIALOG_BTN_CLASS_PRIMARY,
      id: Dialogs.DIALOG_BTN_OK,
      text: "OK",
    },
    {
      className: Dialogs.DIALOG_BTN_CLASS_NORMAL,
      id: Dialogs.DIALOG_BTN_CANCEL,
      text: "Cancel",
    },
  ]
);
The showModalDialog() method provides more flexibility, allowing you to create custom dialog boxes with HTML content and buttons. However, it's recommended to use the specialized dialog APIs like showInfoDialog(), showConfirmDialog() and showErrorDialog() whenever possible, as they provide a simpler and more standardized interface for the most common dialog types.
Visual Reference

Click Here to read more about showModalDialog().
→ Each button object can have:
className: Button styling classid: Button identifiertext: Button label text
→ Available Button Classes:
Dialogs.DIALOG_BTN_CLASS_PRIMARY: Primary action buttonDialogs.DIALOG_BTN_CLASS_NORMAL: Normal buttonDialogs.DIALOG_BTN_CLASS_LEFT: Left-aligned button
→ Common Button IDs:
Dialogs.DIALOG_BTN_OKDialogs.DIALOG_BTN_CANCELDialogs.DIALOG_BTN_SAVE_ASDialogs.DIALOG_BTN_DONTSAVEDialogs.DIALOG_BTN_DOWNLOAD
Handle Button Clicks
You can handle button clicks using the dialog's promise:
dialog.done(function (buttonId) {
  if (buttonId === Dialogs.DIALOG_BTN_OK) {
    const inputValue = $input.val();
    alert("Input value: " + inputValue);
  }
});
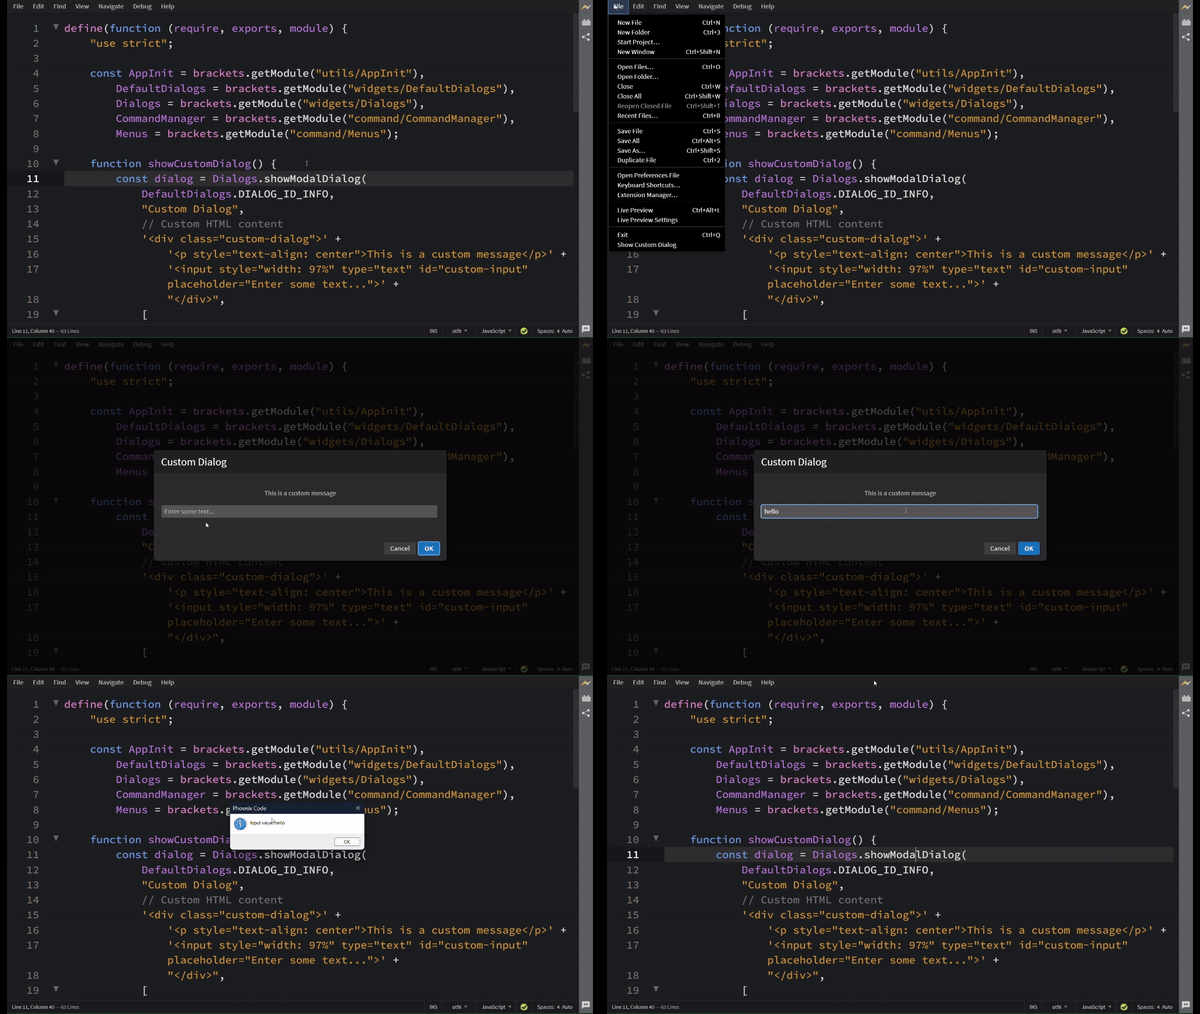
Complete Code Block with Custom Dialog Box and handling the button clicks.
define(function (require, exports, module) {
    "use strict";

    const AppInit = brackets.getModule("utils/AppInit"),
        DefaultDialogs = brackets.getModule("widgets/DefaultDialogs"),
        Dialogs = brackets.getModule("widgets/Dialogs"),
        CommandManager = brackets.getModule("command/CommandManager"),
        Menus = brackets.getModule("command/Menus");

    function showCustomDialog() {
        const dialog = Dialogs.showModalDialog(
            DefaultDialogs.DIALOG_ID_INFO,
            "Custom Dialog",
            // Custom HTML content
            '<div class="custom-dialog">' +
                '<p style="text-align: center">This is a custom message</p>' +
                '<input style="width: 97%" type="text" id="custom-input" placeholder="Enter some text...">' +
                "</div>",
            [
                {
                    className: Dialogs.DIALOG_BTN_CLASS_PRIMARY,
                    id: Dialogs.DIALOG_BTN_OK,
                    text: "OK"
                },
                {
                    className: Dialogs.DIALOG_BTN_CLASS_NORMAL,
                    id: Dialogs.DIALOG_BTN_CANCEL,
                    text: "Cancel"
                }
            ]
        );

        // Get dialog element and ensure input is accessible
        const $dlg = dialog.getElement();
        const $input = $dlg.find("#custom-input");

        if (!$input.length) {
            console.error("Failed to find input element in dialog");
            return;
        }

        // Handle dialog button clicks
        dialog.done(function (buttonId) {
            if (buttonId === Dialogs.DIALOG_BTN_OK) {
                const inputValue = $input.val();
                alert("Input value: " + inputValue);
            }
        });
    }

    // Register command
    const MY_COMMAND_ID = "test_customdialog";
    CommandManager.register("Show Custom Dialog", MY_COMMAND_ID, showCustomDialog);

    // Add menu item
    const menu = Menus.getMenu(Menus.AppMenuBar.FILE_MENU);
    menu.addMenuItem(MY_COMMAND_ID);

    // Initialize extension
    AppInit.appReady(function () {
        console.log("Custom dialog extension loaded");
    });
});
Visual Reference

Adding a button on Status Bar
-
Import the
StatusBarmodule.const StatusBar = brackets.getModule("widgets/StatusBar"); -
Register the command.
Register the command that will trigger the clicking.
var MY_COMMAND_ID = "helloworld_sayhello";
CommandManager.register("Hello World", MY_COMMAND_ID, handleHelloWorld); -
Add the button to the StatusBar.
To add the button to StatusBar, use
addIndicator():-
StatusBar.addIndicator(
    MY_COMMAND_ID, // unique ID for this indicator
    $("<div>Test</div>").click(handleHelloWorld), // Optional DOMNode for the indicator
    true, // show the indicator
    "hello-world-status", // CSS class
    "tooltip", // tooltip text
);
→ The parameters of the addIndicator() method :-
| Param | Type | Description |
|---|---|---|
| id | string | Registration id of the indicator to be updated. |
| [indicator] | DOMNode or jQueryObject | Optional DOMNode for the indicator |
| [visible] | boolean | Shows or hides the indicator over the statusbar. |
| [style] | string | Sets the attribute "class" of the indicator. |
| [tooltip] | string | Sets the attribute "title" of the indicator. |
| [insertBefore] | string | An id of an existing status bar indicator. The new indicator will be inserted before (i.e. to the left of) the indicator specified by this parameter. |
For a detailed description, refer to this link.