Why Your HTML Preview Is Missing CSS, Images or JavaScript

An HTML file can link to CSS, images, and JavaScript without copying those files into it. If a preview is missing styles or images, first check the file paths and the preview permissions. If a button does nothing, check whether scripts are allowed. This guide also helps when CSS is not loading, HTML images are not showing, or JavaScript is not working in HTML.
The examples below use Phoenix HTML Viewer. HTML and CSS written inside the document work by default. Hosted files and JavaScript each need permission in the Viewer. The Viewer reads the HTML file you open; it does not import the files beside it.
You will need: your HTML text or an .html file. The Viewer is free and runs
in your browser. For the last steps, keep any separate CSS, JavaScript, and image
files with your HTML. You can use file editing and Live Preview. These features
are in both Phoenix Pro and the free Community edition.
Identify what is missing
| What you see | First check | Next step |
|---|---|---|
| Hosted CSS is not loading | Is external access enabled? | For trusted content, turn on Allow external resources. Then try the hosted example. |
A local styles.css file is not loading | Did you open only the HTML file? | Open the full project folder in Phoenix Code. |
| An image is not showing | Is its address a hosted URL or a local path? | Check the path and filename. |
| A hosted file still does not load | What URL did the browser request? | Check the failed request. |
| A button does nothing | Is JavaScript allowed? | Test a small inline script before you debug a bigger one. |
If the stylesheet loads but the page still looks wrong, check whether the CSS rule targets the right element or another rule overrides it.
Test HTML and inline CSS
- Open the HTML Viewer.
- Click inside HTML source and paste the complete document below, replacing any sample text already there. It needs no downloaded stylesheet, image, or JavaScript.
<!doctype html>
<html lang='en'>
<head>
  <meta charset='utf-8'>
  <meta name='viewport' content='width=device-width, initial-scale=1'>
  <title>Preview check</title>
  <style>
    body {
      background: #f4f6f8;
      padding: 24px;
    }
    p {
      color: #164ea6;
      font-size: 20px;
    }
  </style>
</head>
<body>
  <p>HTML and inline CSS are working.</p>
</body>
</html>
- Look at the Rendered preview panel. On a narrow screen, switch from Source to Preview to see the result.
You should see a blue paragraph on a pale background.
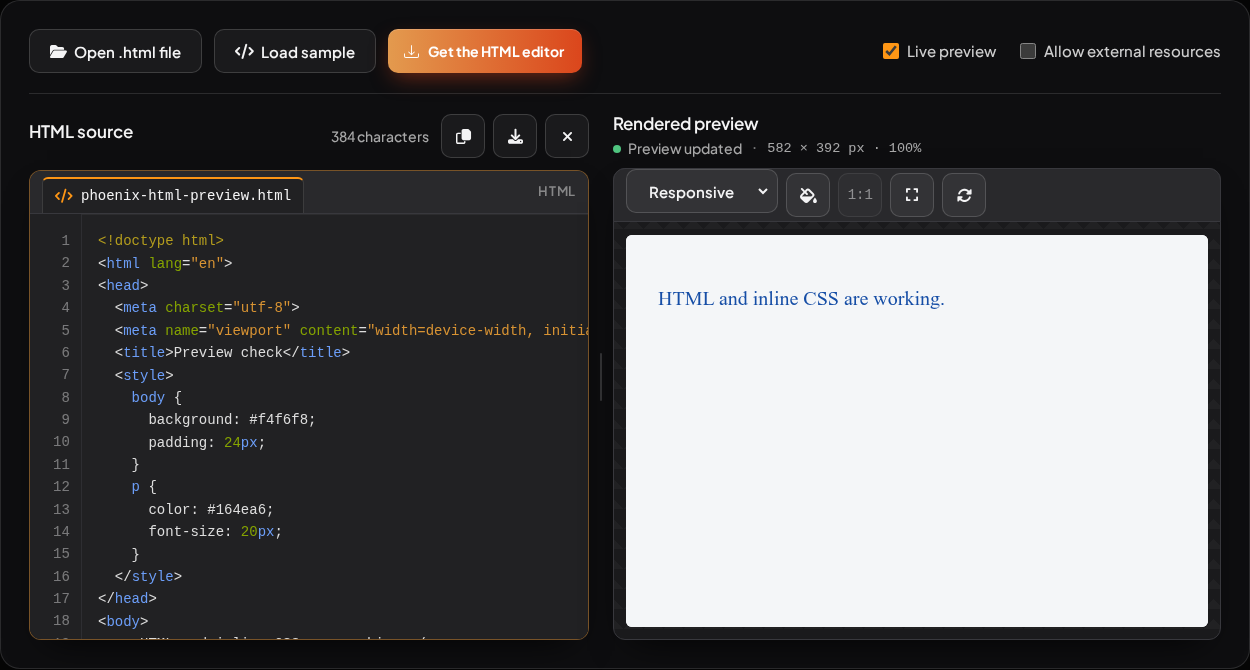
If this works, add parts of your original page a little at a time: HTML first, then styles, images, and scripts. When the preview breaks, check the last part you added.
To check your own file, choose Open .html file above the source editor. This replaces the current source. To keep your edits, use Download .html in the source toolbar first. On desktop, this is the download-arrow button with that tooltip.
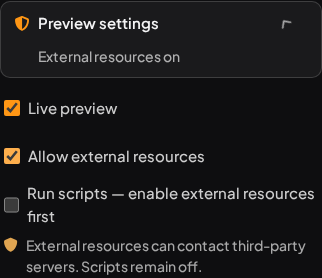
If changes stop appearing, check whether Live preview is on. Its checkbox and Allow external resources are above the editor on a wide screen. On a narrow screen, open Preview settings below the workspace. When Live preview is off, use Refresh preview after you edit.
Keep local files in the expected folders
For a working example, download the image-and-text practice project used in our image layout tutorial. Extract the ZIP first. Keep these files together in the extracted folder:
image-text-layout/
├── index.html
├── styles.css
└── images/
    └── woodland.jpg
Inside index.html, a stylesheet reference belongs in the head:
<link rel='stylesheet' href='styles.css'>
An image reference belongs where the image should appear in the body:
<img src='images/woodland.jpg' alt='A sunlit path between tall trees'
  width='1200' height='675'>
The first path expects styles.css beside the HTML file. The second expects
woodland.jpg inside an images folder. Check that the
filenames and case match the files you have. For your own project,
use your image's filename, dimensions, and description.
Opening only index.html in the Viewer leaves those files behind.
Allow external resources cannot give the Viewer access to other files on
your computer. Keep the files together and use
the full-project workflow below.
Check hosted URLs and relative paths
A full URL such as https://example.com/images/logo.png points to a file on a
website. This is an example URL; replace it with your own image URL when testing.
Hosted images, stylesheets, and fonts need Allow external resources in the Viewer.
To see the difference, replace the Viewer source with this complete example. It loads the same practice stylesheet and woodland photo from the docs website:
<!doctype html>
<html lang='en'>
<head>
  <meta charset='utf-8'>
  <meta name='viewport' content='width=device-width, initial-scale=1'>
  <title>Hosted resource check</title>
  <link rel='stylesheet'
    href='https://docs.phcode.dev/tutorials/image-text-layout/styles.css'>
</head>
<body>
  <h1>A woodland walk</h1>
  <div class='feature'>
    <img
      src='https://docs.phcode.dev/tutorials/image-text-layout/images/woodland.jpg'
      alt='A sunlit path between tall trees' width='320' height='180'>
  </div>
</body>
</html>
- With Allow external resources off, the heading is unstyled and the photo does not load.
- Turn on Allow external resources for this example. You should see a dark green heading, a pale background, and the woodland photo. Leave scripts off; this example needs only HTML, CSS, and an image.
The photo is by Johannes Plenio on Unsplash, as credited in the practice project. This example uses complete hosted addresses; it does not access files on your computer.
A relative path starts from another location. For paths in your HTML:
styles.cssand./styles.cssresolve from the current directory.../styles.cssresolves from the parent directory.- On an HTTP or HTTPS page, the browser resolves
/styles.cssfrom the site root, even when the page is in a subfolder.
A relative path does not mean 'find this file anywhere on my computer.' MDN explains how relative references are resolved.
For a background image in an external CSS file, a relative url(...) starts
from the stylesheet's location,
which may be a different folder from the HTML file.
If a hosted file still will not load
Permission alone will not fix a wrong URL or a missing file. Open the image or stylesheet URL in a new tab. It should show the image or CSS itself, not a sign-in screen or a sharing page.
To see what the preview actually requested in Chrome on desktop:
- Open Chrome's three-dot menu, then More tools > Developer tools. Select Network in the developer tools panel.
- In the Viewer, turn Live preview off and click Refresh preview. Keep Allow external resources on only for content you trust.
- Find the image or CSS request in Network. Select it and open Headers to check Request URL and Status Code.
| What you find | What to check |
|---|---|
404 | The server could not find that URL. Check the filename, case, and folder path. |
| A blocked request | Read the browser's Console message for the reason. Renaming the file will not fix a preview restriction. |
200, but the page is still unstyled | Check that the response contains the expected CSS, then check which rules apply to the element. |
Chrome's Network guide explains the request details. Turn Live preview back on when you are done. External resources can contact other websites, so leave them off for HTML you do not trust. Do not disable browser security to make a preview work.
Test a button with inline JavaScript
Paste the first, self-contained example
back into the Viewer. Add this button after the paragraph, just before the
closing </body> tag. Start with Allow external resources off.
<button type='button' onclick='this.textContent=`Clicked`'>
  Test button
</button>
With scripts off, the button appears, but clicking it does not change its label. Turn on Allow external resources, then select Run scripts — enable external resources first. Click the Test button in the preview again; its label should change to Clicked.
Changing these permission settings refreshes the preview and resets the button. Click it again after you change a setting.
This tests JavaScript written inside the HTML. In pasted HTML, the Viewer can
run inline scripts, but it blocks external <script src> files and fetch/XHR
requests. If your page needs separate JavaScript files or modules, open the full
project in an editor. If it also needs a backend server, run that server too.
If your own inline script still fails, open the developer tools Console. Fix the first error from your script, then test again.
Open the complete project in Phoenix Code
For a complete editing workspace, use Phoenix Code. Work on your HTML, CSS and JavaScript files together, with Live Preview alongside your code.
For HTML that links to local CSS, images, or scripts, use
Phoenix Code's project workflow.
Follow the extracted practice project above. Open its original
index.html, which uses local paths. The hosted example above was only for
testing resource permissions.
For your own project:
- If you edited the document in the Viewer, use Download .html to save it. This downloads the HTML source; it does not collect referenced images or stylesheets.
- Keep that HTML file with its CSS, JavaScript, and images in the folders its paths point to.
- Open Phoenix Code on desktop, or use its browser app in Chrome or Edge for local-folder access.
- In the Start Project Dialog, choose Open Folder and select the folder containing the HTML file. If the dialog is closed, click the folder icon at the top left to open it again. The project files should appear in the file list.
- Click your HTML file in the file list. If the preview is hidden, click the lightning bolt at the top of the right toolbar to show Live Preview.
- If Phoenix Code asks whether you trust the project, choose Trust & Execute Preview only for a project you trust.
- Fix any incorrect paths in the HTML and use File > Save File. In Live Preview, check that the stylesheet changes the page and the image loads.
The Viewer link does not transfer your project. Save your edited HTML in its project folder, then open that folder in Phoenix Code.
In the practice project, opening index.html should show Plan a woodland walk,
the forest photo, and Take the scenic route. To arrange that photo beside its
text, continue with the image-and-text layout tutorial.
Q&A
Question: Why does inline CSS work in the HTML Viewer, but my separate styles.css file does not?
Short answer: Inline CSS is part of the HTML document you paste or open, so the Viewer can render it right away. A separate local styles.css file is not loaded when you open only the HTML file. If your page uses local CSS, images, or JavaScript files, keep them in the right folders. Open the full project folder in Phoenix Code instead of just opening the HTML file in the Viewer.
Question: Does Allow external resources make local files on my computer available to the preview?
Short answer: No. Allow external resources lets the Viewer load hosted resources from websites, such as full image or stylesheet URLs. It does not give the Viewer access to other files beside your HTML on your computer. For local files like styles.css or images/woodland.jpg, use the full-project workflow and open the folder that contains all related files.
Question: What should I check first when an image does not appear?
Short answer: First check whether the image uses a hosted URL or a local relative path. For hosted images, make sure Allow external resources is enabled and that the URL opens the actual image, not a sign-in page or a sharing page. For local images, make sure the filename, case, and folder path match exactly. Remember, a relative path does not search your entire computer.
Question: Why does my button show up but not respond when clicked?
Short answer: The button may rely on JavaScript, and scripts are off by default in the Viewer. For trusted content, enable Allow external resources first, then enable Run scripts — enable external resources first. If inline JavaScript still fails, open the browser developer tools Console, fix the first script error shown there, and test again.
Question: When should I switch from the HTML Viewer to Phoenix Code?
Short answer: Use the HTML Viewer for quick checks with pasted HTML, inline CSS, hosted resources, or small inline JavaScript tests. Use Phoenix Code when your page needs local CSS, images, JavaScript files, modules, or a full folder structure. Phoenix Code's project workflow lets Live Preview resolve local paths from the project folder.